
This shoe is designed for four-legged creatures who have a "dropped paw." Nerve damage, arthritis and injuries can cause a dog to start "knuckling" or standing on the "wrong side" i.e. dorsal side of his foot, like this:

The measurements below are all approximate and clearly written by someone who knows nothing about sewing. (My measurements are in visual cues, like hand-lengths. A yard is whats in front of my house.) Also keep in mind my dog's ankles and feet are very small, so adjust accordingly. I put a link to all products where I could. (Let me know if any links are broken or you have a better source) You'll find an otter pelt resource on the sidebar. If anyone makes a shoe with alternate materials (especially if anyone finds something as good or better than fur, which I haven't) please tell me and I'll post it! (prettylittlemistakes at gmail. com)
***Please feel free to pass this information around far and wide, post it anywhere, mail it, xerox it, put it on a billboard! Also - C'mon over and visit Walter's blog anytime you want a smile!
HOW TO MAKE A PUG UGG
I'm not going to lie to you - this is a lot of work, but the results are phenomenal.
DISCLAIMER! I am NOT a vet, or a medical professional. I'm not even that fond of shoes. I'm just a novelist whose dog got hit by a car and this is the shoe I came up with after a year of trial and error. (And trying all the vets awful shoes!) So please CONSULT YOUR VET when making this shoe for your dog...unless of course you're like me and want to IGNORE YOUR VET and do it anyway.
The Pugg Ugg uses "Brooklyn Bridge" technology, in that we're suspending a stable area on the leg - to an unstable one. There are two parts to the moccasin.
1) The shoe, which looks like a little oven mitt with fur on the inside, and slips over your dogs foot.
2) The cuff, which encircles your dog's leg, just above the hock.
The cuff has two elastic bands attached to it that reach down like guy wires to the toes, holding the foot in the correct "L" position. The hock bone keeps the cuff from sliding down. You'll see what I mean below.
remember, the PRIMARY GOAL is to have NOTHING touch your dogs foot except fur. This means all the seams, and knots in your thread must be on the OUTSIDE of the shoe. Never on the inside. Also any hard edges (i.e. of the velcro) have to be overlapped with fur. This is the opposite of "normal" sewing, where all the seams and knots are hidden on the inside. We want all the seams and knots on the outside, where they can't rub skin raw. (Hooray!)

- Otter Pelt - About two hand lengths. Enough to wrap around your dogs foot completely, plus an inch or two extra for the cuff. Beaver, Mink or any other water-animal is okay too. These will not get hard after getting wet. Even if your dog isn't running into the ocean, he'll still wander through morning dew in the grass, and any moisture will toughen other pelts and hides up. Tough hides mean hard spots, which mean owies. No good. **see side bar for resource
- Deer Hide - about one hand length. Deer Hide will stay soft and pliable after getting wet. **see sidebar for resource
- Heavy-duty Velcro - about 1/2 yard or one hand length. Enough to circle your dog's hock AND to circle your dog's paw.
- Heavy-duty waxed thread or Deer Lace
- Leather needle and/or Awl - I usually use both. The Awl for puncturing, the needle for stitching.
- Metal buttons - medium sized. You can use plastic buttons too, metal's just sturdier.
- Elastic - Thicker for bigger dogs, thinner for smaller dogs.
- Pencil/Ballpoint pen - I try to use something with a thinner line, so it doesn't show on the shoe.
- Glue Gun - optional, you can stitch the sole, but glue gun is easier.
- Sno Seal - optional, increases life of shoe, makes shoe water resistant.
PART ONE: BUILDING THE SHOE

Step One. Measure your dogs foot. Lay your dog's bad foot flat on the Deer Hide and trace around it,with a little extra around the edges. This will be the sole of the shoe. (You can always trim later. Better too much than too little.)


Step Two. Take the leather template and cut it out.Then put it on the back of a piece of otter.

Step Three. Trace out the template twice, adding a "smokestack" on each end. Your dogs foot will rest on the leather, and the "smokestack" will be the part that wraps further up his foot. Use the left over pelt to make a straight narrow strip. This will become the hock cuff.


Step Four. Cut out the Otter pieces. (Save your scraps for later repairs.)


Step Five: Sandwich the two "smokestack" pieces together, so the fur is on the inside. With your awl and waxed thread (or leather needle and deer lace) sew them together, so they make an "oven mitt," without the thumb. NOTE: Start sewing high on one side, but stop an inch or so lower on the other side. (As seen in orange picture above.) This is so you can get your dogs foot inside more easily.
Try this lopsided oven mitt on your dogs foot. It should go in without too much effort, but be snug. It should cover the bottom of the foot completely (all the pads) and also go a little further up. Make adjustments as needed.


Step Six. Remove the sticky back from a long FUZZY velcro piece and position it at least a 1/4 inch below the opening of the oven mitt. (You want extra fur at the top so the edge of the velcro doesn't rub skin raw.) Stick it on. Be sure the velcro wraps all the way around the shoe, and still has at least a 1/2 inch "tail" extra. This "tail" will be sticky, with nothing on it.
Now, cut a 1/2 inch piece of PRICKLY velcro, remove the backing, and press it to the 1/2 inch "nude" sticky back of the fuzzy velcro. So sticky-back is stuck to sticky-back. Press these sticky pieces together firmly. What you should have now is a piece of velcro that wraps around the shoe and affixes itself to itself. (Oy. lost yet? Anybody have a better way to word this?)


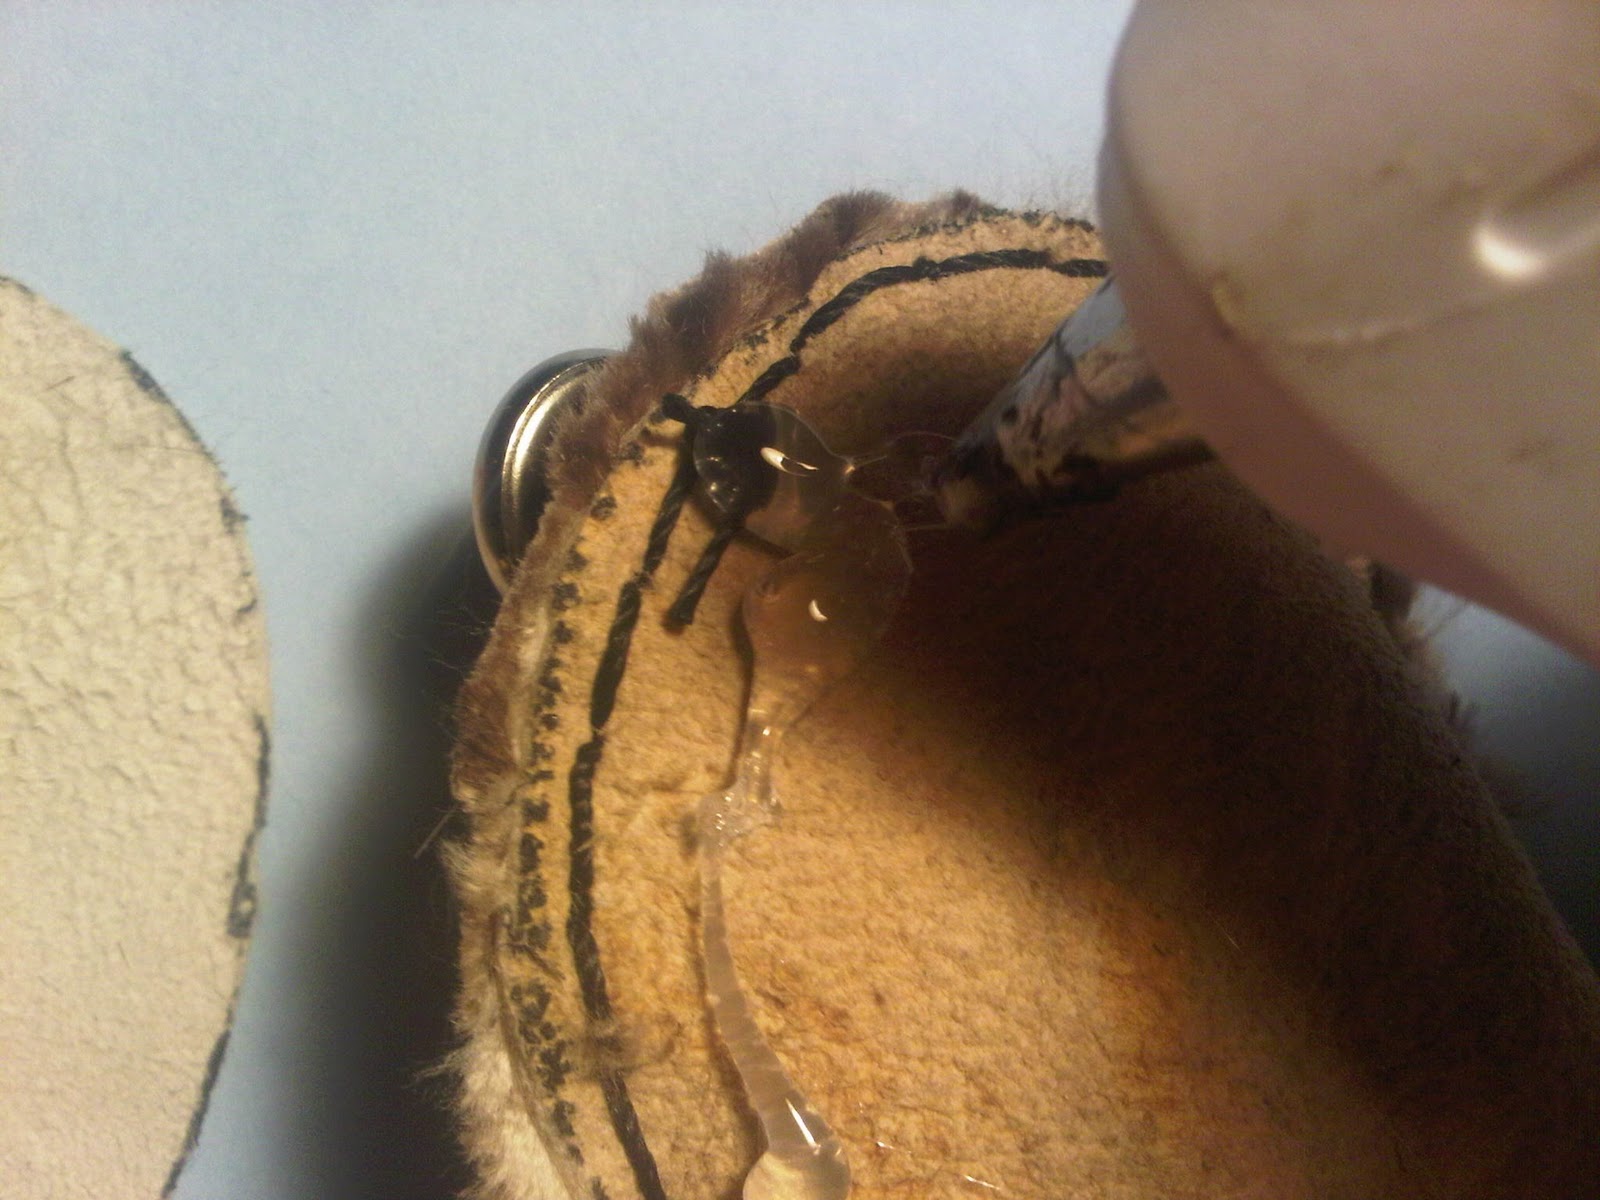
Step Seven. Anchor the velcro at key points so it doesn't rip off. The sticky back isn't really very strong and the oils from the otter pelt work against it, so use the awl/leather needle and waxed thread to affix it to the shoe. *very important - when stitching, make sure all knots are on the OUTSIDE of the shoe, not the inside. I usually make four anchor points. (If your awl or needle gets gummy from sticky-back, use nail polish remover to clean) DO NOT use the glue gun. I tried it once and it made the shoe hard, which chaffed Walter's skin. Use the awl to "pre-drill" holes if it's hard to get the needle through.


Step Nine. Add the buttons. You want to put them on the toes, at 10 o'clock and 2 o'clock. I like metal buttons for sturdiness, but any buttons will do. Medium size is best. Small ones don't hold the elastic bands well and large ones get caught on rugs and twigs.


Step Ten. Attach the leather sole to the bottom of the shoe. (side without buttons.) This is the piece we cut in step one. The sole is very important - If you were to let your dog run around on just the otter pelt, it'd rip/wear thru in about 3 days. I recommend gluing the "shiny" side of the leather to the otter pelt, as the shiny side is more slippery. You can stitch the sole on with your awl, or use a glue gun. I like to use low-heat mini glue guns, which are less likely to burn you. Make sure to get glue on the knots which are holding your buttons, and all along the seams, helping with strength and water-proofing. Press hard and get it all sandwiched in good.This is the one place you can use glue, and the more the better, so don't be stingy.
PART ONE IS COMPLETE!
YOU RULE!
You are making a freaking dog shoe and you are rocking it!
PART TWO: BUILDING THE HOCK CUFF

Step One. Take that rectangular scrap piece of otter pelt we cut( step three in building the oven mitt,) and wrap it around your dogs ankle, ABOVE THE HOCK. (Hock is the bony elbow-like thing on the back side of his leg, above his foot.) Mark where the fur meets.

Step Two. Trim the fur, cutting it at that mark, so it encircles the dogs leg just once.

Step Three. Cut a piece of FUZZY velcro just a bit wider and about 1/2 inch longer than your piece of fur.(the fur in this photo isn't as long as it looks...the hair is making it look bigger)


Step Four. Remove the sticky back from the FUZZY velcro piece. Position the fur flush with the bottom edge and press on. Cut a 1/2 inch piece of PRICKLY velcro and position that on the top, so the entire sticky back of the velcro piece is covered by fur and prickly velcro. (This is the same scenario I tried to explain in the first velcro instruction...possibly shown better here.)
 |
| Inside |
 | ||
| Outside |


As for the elastic itself, for smaller dogs, you can sew on two hair rubber bands. For larger dogs, use sewing elastic. you may have to experiment with elastics, but I have great success with plain old rubber bands. You can affix the elastic many different ways. You can use a small metal ring or clasp to affix the elastic, but I simply sew the elastic rubber bands right to the hock cuff.

 | |
| Finished! |
NOW LETS PUT THIS BAD BOY ON!
 |
| Start with a good angle.Check pups foot and pads, run finger in between toes, make sure there are no little bits of dreck in there. It'd be like having a pebble in your shoe and not being able to get it out~! |
 |
| put the lower piece, the oven mitt, on first. |
 |
| Be sure to get foot all the way down inside, and check to make sure toes are straight, not curled or caught on anything. |
 |
| Secure velcro around ankle- make sure fit is snug, so snug you can't even get a pinkie finger in there. It takes awhile to know how tight is tight enough (and not too tight.) Don't worry, you'll figure it out in time. |
 |
| Once the lower part is on and tightened, put on the hock cuff. Be sure to put this on ABOVE the hock, and put it on tight. #1 malfunction in this design is when the hock cuff isn't on firmly enough. |
 |
| Make sure elastic is at front and center of hock cuff. |
 |
| Now wrap each rubber band around its respective button down by the toe. |
 |
| The elastic bands reach down from the cuff to the toe like a suspension bridge. This is what keeps your dogs foot in an "L" formation. |
 |
| Double check the velcro tabs and the elastic bands. |
 |
| Now let pup stand up. Make sure hock cuff stays above the hock and watch them walk a few steps. If the foot still drags, it means the elastic bands aren't tight enough. Just put another knot (or two or three) in each rubber band, and/or double-loop them around the buttons. This shortens the bands, which tightens them, which holds the foot at a sharper angle. |
|
| Let your dog walk around in the Pug Ugg for 15 minutes, increasing it by 15 minutes every day, until you're up to 8-10 hours a day. After that, it's good to let them rest/sleep without the shoe on. (Just like we rest without our shoes on.) |
 | ||
| Soon enough, you'll be able to take your dog anywhere, anytime. Check your dogs shoe daily for any debris that might have fallen inside. Also check their foot daily for any red spots or "worn" hair. Both signs something is rubbing his skin. Most likely a stitch or stray corner of something hard, like the velcro. Make adjustments and soon you'll have the perfect shoe! |
ADDITIONAL TIPS

1. I always have a spare shoe ready, in case one goes missing or haywire. I also keep a tacklebox with spare parts and tools in it, for easy repairs and adjustments. When we travel, the tacklebox comes with us. Even when the shoe is on firmly, Walter can go for a romp, and come back missing the lower half of his shoe. Always good to have backup.
2. When using waxed thread, sometimes the knots can slip. An easy solution is to light a match and quickly burn the ends of your knots, melting them into a little gooey pile (but not smoking them off completely) This makes for a very strong knot. Also if you have stray hair sticking out in between the two pieces of pelt, trim them with a scissors and then singe the edges lightly with a match. This gives you a nice, uniform edge and a clean line.
3. No/Low glue gun use! I must re-iterate, since I made the mistake so many blasted times myself, that the ONLY place you can use the glue gun, is when affixing the bottom of the shoe to to the leather sole. You can't use it to attach any of the velcro. It makes the velcro stiff, and rubs skin raw. I can't tell you how many times I got sick of stitching everything by hand, and thought "Heck, I'll just glue gun it..." Only to find walter limping 24 hours later. The fact is, these shoes must be carefully and lovingly made, and shortcuts only lead to owies.
5. Check the shoe periodically for places where the stitching might be giving, and run your fingers inside the shoe, checking for worn spots and any debris that might've fallen inside. Also check the tautness of the elastic, as over time it will weaken, and need to be replaced.
6. Do NOT wash the shoe or put it in the dryer. If it gets dirty, blot with a damp sponge. If it gets wet, just let it air dry. (Another good reason to have a second shoe) Also, if it gets really wet, like your dog goes swimming, do take it off and let it dry as soon as you can. If you got ANY moisture in the old orthotic shoes, it would cause severe chafing and make the foot raw almost immediately. The Pug Ugg will not do this, BUT it's still a good idea to take it off and let it dry as soon as you can, so the stitching doesn't weaken.
7. Please let us know if we can help. I have made a few shoes for other people and if you can't make one yourself, and really need one, let me know and we'll figure something out. My goal, is to help anyone who needs a pug ugg, to get a pug ugg. We've been blessed many times over and want to extend the same love to you. Because you are reading a website about alternative dog shoes, which means you're AWESOME.
xoxoxoxoxo,
Heather McElhatton


